Tuesday, October 22, 2013

And even more about Smocking...

I may be teaching a "how to smock" class at Bits of Thread in DC next spring, so I've begun doing all sorts of research on how smocking has been used throughout history (not that easy to find, unless you're talking tradition ("English") smocking.  I am focusing on Canadian or North American smocking.  Here's a fine example of it from one of Judi Dench's costumes from Shakespeare in Love...
Look at those sleeves! 

Here are a few things I've made as samples, just to see what types of fabric work, and what types of patterns work on different materials.  
This first one is on a piece of Thai silk.  After smocking, I tried ironing a bit after smocking...just to see what would happen.  I'm not sure I like it, but if I ever wanted to do something with it, I could rinse it out & fluff it up.  I was going for the Judi Dench sleeves look, but don't have the patience. Notice I didn't add any pearls either! ;-)
The front of a small piece of batik.  I tried this to show that the business of the print sort of takes away from the smocking (though it does look better in reality).  And here is the back, about 1/2-smocked, with the Pellon grid + my marks:  


This is on a piece of cotton velvet.  I think it looks quite nice.  It makes the square into a parallelogram, and it would take a firm cushion & some work to re-square it.  But it looks a lot better pulled out into a square so the design shows.  
Fake suede, very slick & polyester-y.  I think if you were going to do something with the squares you'd have to fill them with batting as you stitched each one.  I've seen this recommendation for other smocking patterns, too. 
Front of doubled 5mm silk
This is the back of the doubled 5mm silk I bought way too much of. You can see all my markings on it; all made with the iron-away Pilot Frixion pens.  Rubbing the lines, or a bit of warmth, removes them completely.  
This very slick polyester hasn't been tamed into smocking yet.  First I tried ironing on the Pellon fusible grid interfacing, but it made this thin silky material way too stiff & weird looking.  Then I tried drawing a grid on the back with the Pilot pens, but really couldn't see what was happening, partly because of the print, but also because the silky material resists the pen.  I could probably use a Sharpie to draw the grid, but that would be pointless because if it shows through, that won't be pretty.  

I may try ironing on the grid again, then washing it before I do the smocking.  Or washing it after I smock.  Either way, I want to find if the grid interfacing will soften up and the fabric will look like silk.  On the other hand, smocking really requires fabric with a bit of stiffness to it, so who knows--it may look awful no matter what!  

I found a few more blogs with posts about Canadian/North American smocking.  First, Vani, who does lovely work, embroidery & yummy cooking, but here's one of her detailed posts about a trellis pattern with flowers that I found really helpful.  She is good about answering questions, too.  

For some more lovely smocking used in haute couture, here's a post about Miu Miu from 2012.  

Passion et Couture has a wonderful trellis pillow she made using printed cotton; it's just the right mix of print & fabric & technique!  

Lovely curtains with smocking at the top from Maison de Pax!  This honeycomb pattern is simple but ever so effective, don't you think?

Finally, after quite a bit of research, I've found 1 book in 2 volumes by Debbie Shore which seem to focus on Canadian smocking, not English smocking (though she is English).  The publisher is Vive Books, and the title is Modern Smocking.  You can get a CD version, or a downloadable e-book, and there's a deal if you buy both volumes together.  

If you look up Debbie Shore on YouTube, you'll find she's done quite a few tutorials, which will give you plenty of ideas for applications & techniques!  

If you give it a try, please let me know...I'd love to see what you come up with.   

Tuesday, October 15, 2013

Peace, Man! Or, Peace Shirt for My Man

I've been getting a lot of use out of the Vogue 8800 pattern for the Roommate.  It doesn't come with a pocket, but I've been adding patch pockets & slash pockets because he needs a place to put his smart phone!  

Here he is showing off his handiwork in our sun room, which is slowly getting turned into a real comfy-cozy room, rather than a conglomeration of intentions.  Anyway, he'd just hung the 2 window frames we got in Bahrain, which I believe look amazing against the stenciled wall behind him.

I think that high-quality work deserves another fun shirt for such a cute boy!

And below you can see the fun buttons I found, too.  They are metal, which seems super-cool to me.

Tuesday, October 8, 2013

From the Collection: Straw Into Gold

Whenever I look at weaving or knitting, or ikat or batik or crochet or quilting, I think "straw into gold." Which is really what any type of textile craft/design/skill/creation is...

Artists take this


or this 


or even this 
then turn it into fiber...then into art!

This is a skirt (falda) from Guatemala.  It's cotton & woven of fibers not much thicker than the thread used for sewing.  And it's incredibly long (33" x 152"), meaning that it must have taken ages to make.  The narrow ends are sewn together to make a loop and the women step into them, then wrap them around and tie them with a belt (cinturon). 

This is a Baluchi woolen rug, from northern Oman.  Though the wool is quite coarse, I love that the design is so intricate, again a lot of work (and paying attention).  The dyes are all traditional, too, which is hard to find. 

Here's another example of amazing work, but with modern dyes, a woolen rug from southern Egypt.  

And one example of Navajo weaving...a saddle blanket. Probably from the 1930s (again, natural dyes give a hint of age, but also that it's worn).  But I'm no expert!

And another Navajo weaving, a chief's blanket, also from the 1930s.  The dyes are in better shape on this one...perhaps because it was used less (it would have been worn around the shoulders, not sat on)?  

Finally, a recent arrival to the collection...a friend just gave me this, she got it in Thailand. It is very finely woven with cotton and silk yarn not much thicker than sewing machine thread!  I cannot begin to imagine how much time this took! 

To give you an idea of the work involved, here's a picture showing the back & front.  Sorry the photos aren't the best; there seemed to be a glare off the fabric, which is one of the reasons I'm pretty sure silk is one of the materials.  

I just realized I have a class tomorrow evening at Bits of Thread, so have to go prep for that!  Thanks for reading!  

Tuesday, October 1, 2013

Smocked Pillow

I bought this remnant of navy fake suede a while back to try with smocking.  I mentioned in my previous post that I want to make a bunch of smocked pillows for our soon-to-be-purchased couch.  

Here's a bit of info about how to smock, and to show you what's been happening with this particular item...


Here is my cheap-o way to get a grid on the back of the navy suede.  I had a bunch of scraps of fusible interfacing.  I then drew a grid onto that interfacing.  You can buy Pellon fusible grid interfacing, but it's rather expensive (I think).  
Depending on the type of design you want on the front, you draw different patterns of lines on the back.  If you look to the right side of the above photo, you'll see I've already done some of the stitching: Tuck & tie the solid lines, while leaving loose the spaces between the solid lines.  You can see my knots & my loose pieces of thread if you look closely.  
I think it is magic.  That simple grid & markings, some easy stitching, and Wow! A lovely basket weave 3D design on the front of my suede pillow!  
Above are some remnants I got from fabric.com.  I wanted to see how these fabrics would look when smocked.  The cheetah is a very shiny polyester, the brown is another fake suede.  The solid cream & eggplant are linen/rayon blends and the 2 flowery prints are from Amy Butler's Gypsy Caravan Stash line.  

However!  There is a problem.  I love the 2 Amy Butler & linen fabrics so much...but only got a yard or 2 of each.  They are all quite wide, though.  So now I'm thinking, "Who needs pillows?!  I need skirts!"  Stay tuned to see what really happens with these!  

A few smocking tutorials from around the web.  And if you're looking for smocking pics, don't be surprised at how many smoking pics you get.  ;-P

Here are honeycomb smocking tutorial & a lattice smocking tutorial from Learning to Fly.  

And a pin tuck smocking tutorial from Sew Mama Sew.

There's also a round pillow project in the first One-Yard Wonders book.  

Update! Found another great smocking pattern on the Threads.com site.  Really cool lozenge looking smocking which would make a great waist decoration (see the photo!).  

And here's the blue suede pillow finished! Well, the smocking is finished (watching a movie is a great way to get handwork done!).  Now I need to make it into a pillow. 

An important consideration is how the smocking changes the shape of your fabric. This was a large square, but now it's a rectangle.  I think some planning & thought would be involved if you had a certain pillow shape in mind when you started.  Me, I'm going to smock smock away, then find pillow forms that fit the completed work!  

Tuesday, September 24, 2013

Smocking! But not for clothing...

When you think of smocking, if you're like me, you think of this:
http://blog.fidmmuseum.org/museum/2009/12/smocked-frock.html
This is from the mid-1890s, and it's Liberty of London!
Or, perhaps you think of this:
http://newarrivalclothing.blogspot.com/2010/03/smocked-clothes-for-easter.html


Or, you might even think of this:
http://oliverands.com/blog/2013/03/the-new-smocking-an-obsession.html
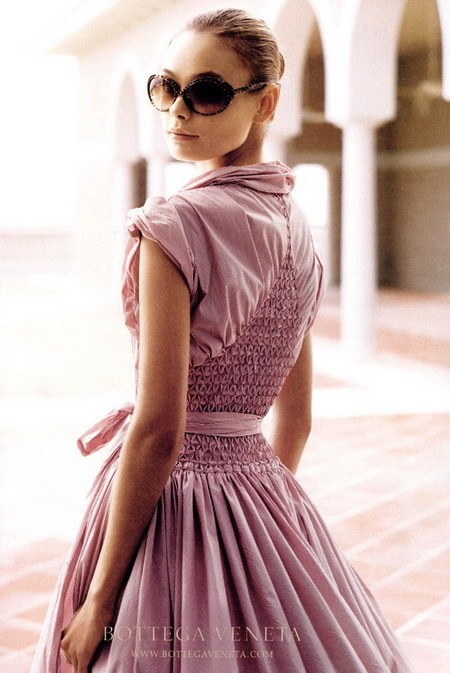
 Bottega Veneta
I must say I love this pink dress.  Smocking is an interesting way to add elasticity to a garment, especially back in the days before rubber & elastic.  For me, just another ingenious technique humans came up with to solve problems.  

I learned a bit about smocking when I lived in Abu Dhabi.  The quilting group there had a demo about it & I was fascinated how flat fabric became richly textured fabric with a few simple marks & stitches.  When I was at my sewing class last week, I bought some fake suede remnants to do some experimentation with smocking.  I'm thinking that when we get our sun room finished and finally buy a couch, we're going to need pillows.  And smocked pillows would be pretty fun.

Also, it's a by-hand hobby (like knitting or crocheting).  Whereas I can only do sewing in my sewing room.  I can smock in the comfort of our sun room with the new fireplace! Obviously I'm planning for winter already!  

Here's a photo of some before navy suede.  Next post I'll show you what I've been doing with it!  

Wednesday, September 18, 2013

Workt By Hand: Quilt Show at the Brooklyn Museum

Flying Geese, 1847
We spent a few days in NYC recently (no, I didn't go to Mood; instead I spent my retirement savings at the Strand Bookstore!)...and happened upon a quilt exhibition, Workt By Hand, at the Brooklyn Museum!  

The idea of the show was to place value on the work of the women who made these quilts, who weren't paid for their work (except the joy of keeping their families warm). 
Flying Geese, again!
Of course I took photos, and thought you'd like to see some.  One impressive aspect of these quilts is they were much older than the ones I usually see in exhibitions.  Easily pre-dating many of the Amish quilts we've seen in Pennsylvania, or the quilts in the collection at the Quilt Study Center in Lincoln, NE by 30 years or so!  

 As always, clicking on the photo will get you the largest version available...

Delectable Mountains, 1850
Wedding Ring, 1850
Another view of Wedding Ring, 1850
Star of Bethlehem, 1850 - ALL silk
Tumbling Blocks, 1850, the colors are mostly silk
Maltese Cross, 1870
Log Cabin, 1890 (Barn Raising Arrangement)
Double Wedding Ring, 1930


Wednesday, September 11, 2013

Some Standing Issues

I've been using my standing desk at work & standing while sewing for a 2.5 months now.  I thought I'd post a few comments on how it's working out so far.

First, I've noticed that I do many things well while standing.  Surprisingly, sewing is easy.  Since I stand to iron and cut out fabric, it seems to be natural to just move over to my sewing machine.  But I notice for more detailed work, hemming by hand, sewing thread chains, I feel like I concentrate better and longer if I'm sitting down. 

It's similar at work. I find I do better with short-term tasks and projects (sorting through email, answering quick questions, reviewing schedules, light research).  For longer term/heavier concentration work, I really feel a need to just sit & concentrate.  Standing & concentrating just doesn't seem to be that easy.  

Another issue is that I only have one way I can put the standing desk in my cubicle (facing south).  Which means I am distracted by everyone who comes in either door (I sit by 2 exits).  Most people don't speak, just go about their work, but I see them, and that's distracting.  Whereas when I'm sitting at my desk (facing west), my back is to whomever comes in either door, and with my headphones on (I get thru lots of podcasts), I can really just focus.  I have really noticed the last few weeks that I'm having trouble focusing.  (A big deal as I have to do quite a bit of writing & writing is not ever easy for me.) 

I can totally see how a geek desk is the perfect solution if you want to stand more.  You can set it for 2 levels, and the punch of a button just sends it down or up to one of those pre-sets. However, at $874 for the small one (includes shipping), that won't be happening anytime soon!  
 
If you are interested in making your workspace (sewing or otherwise) more ergonomic, check out this post on Craftsy.  They mention chopping off table legs down to fix the height...instead I put cans underneath my cutting table legs to raise the height. (UPDATE: This totally rocks; I do tons of work standing at that table now.  Pinning, cutting out, reviewing pattern instructions, much better done standing.)

So tomorrow at work, I'll be using my lunchtime to undo my standing desk & go back to sitting.  I think I'll miss the standing, but I'm fortunate in that I get many opportunities to stand and walk in my job. I also walk from the metro, and stand in my kitchen & sewing room.  I won't be standing quite as much...but hopefully I'll get some more writing done instead!