Showing posts with label stash-buster. Show all posts

Tuesday, September 30, 2014

When the Roommate Gets Mad...

For some reason, I have a lot of sunglasses.  Actually, I know quite well why: I'm a fair-haired, blue-eyed human who's lived most of her life at high altitudes or in very sunny places, or both.  Skin & eye cancer are both worries, so I always wear sunglasses.  However, I never pay more than $8-10/pair (honest, guv!), and sometimes even less (i.e., free Bike To Work Day specs!). 

But where to keep them has always been a problem. At various times they've lived on top of shelves, in a small table by the front door, or in a cardboard box in a shoe cabinet.  I have scoured the web & Etsy, looking for one great idea, and typically only found something that stored 2-3 pairs (haha!).  My last try at organization was this hanging shelf/hook/bin combo, no longer available at Crate & Barrel, which is pretty great and worked okay. Except trying to get one pair out usually meant 2-3 other pairs fell out; not the best way to have a smooth entry at 6:45 a.m. And there are hooks underneath those specs, which go to waste.  Plus everything was unstable, so the slightest flounce of a raincoat or scarf often meant a cascade of glasses, scaring the cat & irritating the Roommate.  

(This is all in the mudroom, BTW.  We have almost no storage by our front door, so it would be even messier if I tried to move them out there.)

Which brings me to the Roommate.  He rarely makes any type of negative comment about something I'm doing (I really have to be doing something bad or ridiculous), so when he became quite irritated last week & said, "Well, it wouldn't be such a problem if you didn't have so many. And we can't even use the hooks!"  Which is a reasonable comment.  So I got to thinking about what I could make that would fit all my sunglasses, but not take up too much space and would work with the hooks on the bottom of a mirror we already have there.  

I had some heavy duty interfacing (possibly for a smocking idea), so decided to use that, plus scraps. At first I was thinking I'd make narrow pockets.  But I ran that idea by a coworker who suggested grosgrain ribbon sewed at varying widths and angles. I don't have any grosgrain, so decided instead to make strips, also out of scraps.  I'm so glad I got her opinion (thanks!).  

You can see it here, on the left.  I made a little strap with a snap to go through the triangle-shaped hangers that were on the mirror when we bought it (I've never figured out what they could be for), so it didn't make a new hole in the wall.  

It's not super pretty, but I just wanted to use up stuff, so wasn't worrying too much about matching.  I also suspected (and I was correct) that once I got all the sunglasses on it, the mismatched fabrics wouldn't show.  

As you can see, it's got plenty of work to do! When I showed the Roommate, he was super impressed (he always is--enthusiasm honed from years of being an elementary teacher).  

Now they are easy to find, easy to take out and put away & there's plenty of room for more!  

Best of all, the original organizer is more useful, now, too.  We're making good use of the hooks and the pockets, as you can see below...  


Tuesday, April 22, 2014

One Yard Wonder: Lunch Bag for Roommate!

This lunch bag was a quick project because the Roommate often leaves his lunch bag at work...so I decided to make another.  I haven't figured out what I'll do when he leaves both at work, though!

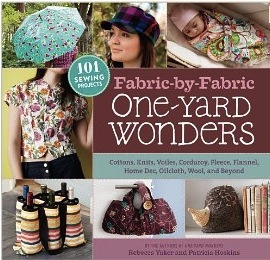
The pattern is from One-Yard Wonders by Hoskins & Yaker, 2009.  It's a great book to use up bits of your stash, the patterns are fairly easy, and there are plenty of ideas inside.  

I used Heat 'n' Bond Iron-On Vinyl on the pieces, inside & out.  I may try running it through the washer, on gentle, just to see what happens to the vinyl.  Have to work up my nerve first!  
Inside is lined with printed kente from Ghana. 
This was only a partial stash-buster because I bought a yard of fabric for the outside (I couldn't help it...batiks were on sale at Hancock!).  But I did use scraps from other projects for the lining.  
I have had many comments when I blog about fun shirts that "my boyfriend (or husband, or significant other) would never wear that shirt!"  I suspect that those guys wouldn't carry this lunch bag either!  Remember, the Roommate teaches 3rd grade, so has no qualms about being a bit wacky.  Just another reason his students love him (and so do I).    

Sunday, May 19, 2013

Enough Already! 4 Pair of Roommate Knickers!

Okay, I finally got the fly figured out!  And I've made the Roommate four pair of knickers now, all using the pattern I got from One-Yard Wonders...

I must admit I didn't figure it out by myself.  I ended up going to one of the open studio classes at Bits of Thread and getting some assistance from Rosalie, who, despite her tender age, has amazing sewing skills.  

The top pair (turquoise/burgundy/yellow) is using up some of the printed Kente we got in Ghana, lo these many years ago, and the bottom pair is flannel; the other 2 pair are actual one-yard pieces I got at a quilt show.  BTW, it's a rainy cool weekend and the Roommate reports the flannel pair were very nice to put on this morning!  

I have many projects in the pipeline, using some fun fabric I just purchased, plus getting some inspiration from a concert we were at on Thursday...but first I must finish up quite a few things.  More on that later!

Monday, May 13, 2013

More One-Yard Wonders: Roommate Knickers v.2

I mentioned I'd found 2 great books in my public library, and ended up buying them both.  You'll see here the 2nd version of boxers from Fabric by Fabric: One-Yard Wonders, which I actually made with less than one yard!  Boy is my life exciting.  If you're interested, the original book is One-Yard Wonders.  Both are written by Hoskins & Yaker.  

I am about to start a 3rd version, with a look to really perfecting the fly, something I've always known was difficult, but I got interested in really trying to get it right after watching my friend Tilly on the Great British Sewing Bee from BBC2.  I have become addicted to Project Runway, so #GBSB was fun because it was soooo different.  (For one thing, much more emphasis on sewing skills, not as much on design...which makes sense, but nice to see a different focus.)  

One of the projects was to make a pair of men's pants...something I will probably never try. But they mentioned how difficult a zipper fly is and I remember that I had done a just-barely-acceptable job on the first pair of knickers for Mr. Roommate, so was enthused to try again.  The verdict?  Well, not quite right, but better.  

I had a lot of fun playing with the stripey fabric on this & if you look closely at the left edge of the photo, above, you'll see that I went all the way to the selvage.  We saw this a lot in West Africa & I think it's a great way to use as much fabric as possible! 

Saturday, April 20, 2013

One Yard Wonder Project #2: Cozy Fuzzy Slipper Socks!


These would be great to use up some fabric, if you have any leftover fleece.  Of course I bought the fleece, but you can use up your stash!  They are great & really comfortable.  I had to play with the seam allowances a bit because the pattern seemed to be a bit tight.  But they came out great and I really like them.  

I used Plasti-Dip, recommended on Ravelry, to spray on the soles so I don't break a hip on our slick hardwood floors.  It's spray-on rubber that really stinks, but after a few hours the smell goes away & you've got slip-free slippers.  

Saturday, April 13, 2013

One Yard Wonder Project #1: Roommate Knickers!


First up from the One Yard Wonders book I mentioned in the last post...knickers for the Roommate!  They were extremely easy and I used flat-felled seams inside & out.  The pattern doesn't need a separate waistband, so that makes it easy.  I have fabric for a second pair, but I'm out of 1" elastic.  

Saturday, April 6, 2013

Do As I Say: Stash-Busting Preacher Tells Others What to Do!

I found two books at the local library which I think you may find helpful if you want to bust your stash.  


Each book comes with a huge packet of patterns for all the different projects.  So far I've traced the patterns for some fleece booties & a pair of knickers for the roommate.  

So you're probably wondering what's up with the "Do as I say, not as I do" quotation...well, let's just say that I didn't have any fleece for the booties, so I had to buy some.  And I found such a good deal on 1 yard pieces at the quilt show last weekend...so I bought 4 for the Roommate's new knickers! 


Wednesday, May 23, 2012

Lunchtime! Oilcloth Lunch Bag Completed

So my lunch bag is finished!  Yay.  I can't wait to use it tomorrow.  In the meantime, I thought I'd put a few tips online for some things I figured out that I hadn't seen mentioned elsewhere.  


You can see the super-cute fabric I got from fabric.com. (I thought they had the best selection, but Oilcloth Addict has a good selection, too, along w/ excellent project ideas & care instructions.) 


Oilcloth is not easy to work with.  It sort of fights back!  I didn't have any trouble getting the slick side to feed through my machine, but apparently some people do & use tissue paper so that the feed dogs can grip the oilcloth.  I didn't have to do that, but at some of the bulky points I did have to push & pull to help the machine.    


Line of stitches to make folding easier &
my rotary cutter, used to press seams & folds.
One thing I did figure out that if you needed a distinct fold sewing a row of stitches makes it a lot easier to fold.  Then you need something to "press" the fold over, because you cannot iron oilcloth.  The back of a spoon is one recommendation, but I found the handle end of my rotary cutter worked well.  


I was using Brett's post on Design Sponge, but really struggled with the measuring & getting things to match up.  I had to measure & re-measure & cut & re-cut, but I'm quite pleased with the result.  And even though no small project ever turns out to be that straightforward for me...I don't think I spent more than 3 hours on the whole thing.  


I am hoping that I will get better at it, because I really want to make a bunch of Brett's storage boxes to help with organization in my sewing room (and possibly in the kitchen, too).  For one thing, I think the little storage bins will be great for patterns.  Right now my patterns are mixed in with my fabric in large Ikea boxes, so a separate place to put them would be really useful.  

Saturday, May 19, 2012

New Project! Oilcloth Lunch Bag

Here's the inspiration. I won't even show you my current lunch bag, made from recycled plastic, purchased at Whole Foods with おいしい on the front (which means delicious). But it is so grody now...it just doesn't come clean anymore. 

I am working away on the Starlet Suit, but it's a long-term project. I like to see things get done so like to have both long & short-term projects going at the same time.

I got the fabric at fabric.com. It comes on these huge rolls, in a very long box (which Bella loves).  The fabric is quite cute & I'll post more up-close photos as I get the project going.

If you need some ideas or further instruction, check out Sewing with Oilcloth.  Check out Oilcloth Addict for more ideas & shopping.  I do have to say I thought the selection was very good over at Fabric.com, too.

Monday, May 14, 2012

A cozy for my new tablet...

As a librarian, I'm not sure whether or not I'm a traitor, but I finally broke down and bought a Samsung tablet!  (Many of my colleagues already have them, so I decided to get on the traitor-wagon).  Anyway, it's a Galaxy 10.1 & I mostly got it for reading. I've checked out 2 books so far from the library, and also have got my subscriptions to the New Yorker & Economist activated.  

Rather than buy a cover, I decided to use a bit of the scraps from my extensive stash & make a quilted cover.  I was inspired by Jamie, and I found her tutorial here:  Quilted Tablet Cover

As you well know, Bella loves to supervise, and here she is, right in the middle of things.  One look at that luscious raccoon tail & you can see why I don't do any cutting when she's around.  

I ended up not using any big pieces, really, just scraps from clothing & other projects.  The button is vintage, from my grandmother's house.  

This is the back, nothing special, but I like doing this non-traditional quilting (with my machine!), overlapping cool 1950s looking boxes, hopefully.  Though  I'm sure this color combo is not at all appropriate to the 1950s.  I do love using scraps...I see dresses & quilts I've made which bring back some great memories.  

Here it is closed, with the very pretty binding fabric showing. 

And the last picture shows you yet another bound buttonhole!  I'm still not an expert, but they are fun, and look soooooo nice.  I had to do some handwork on the inside, to sew down the binding of the buttonhole so it would look neat  look when I open up the case.