Monday, July 22, 2013

Up Next: A Lined Wool Jacket & Dress

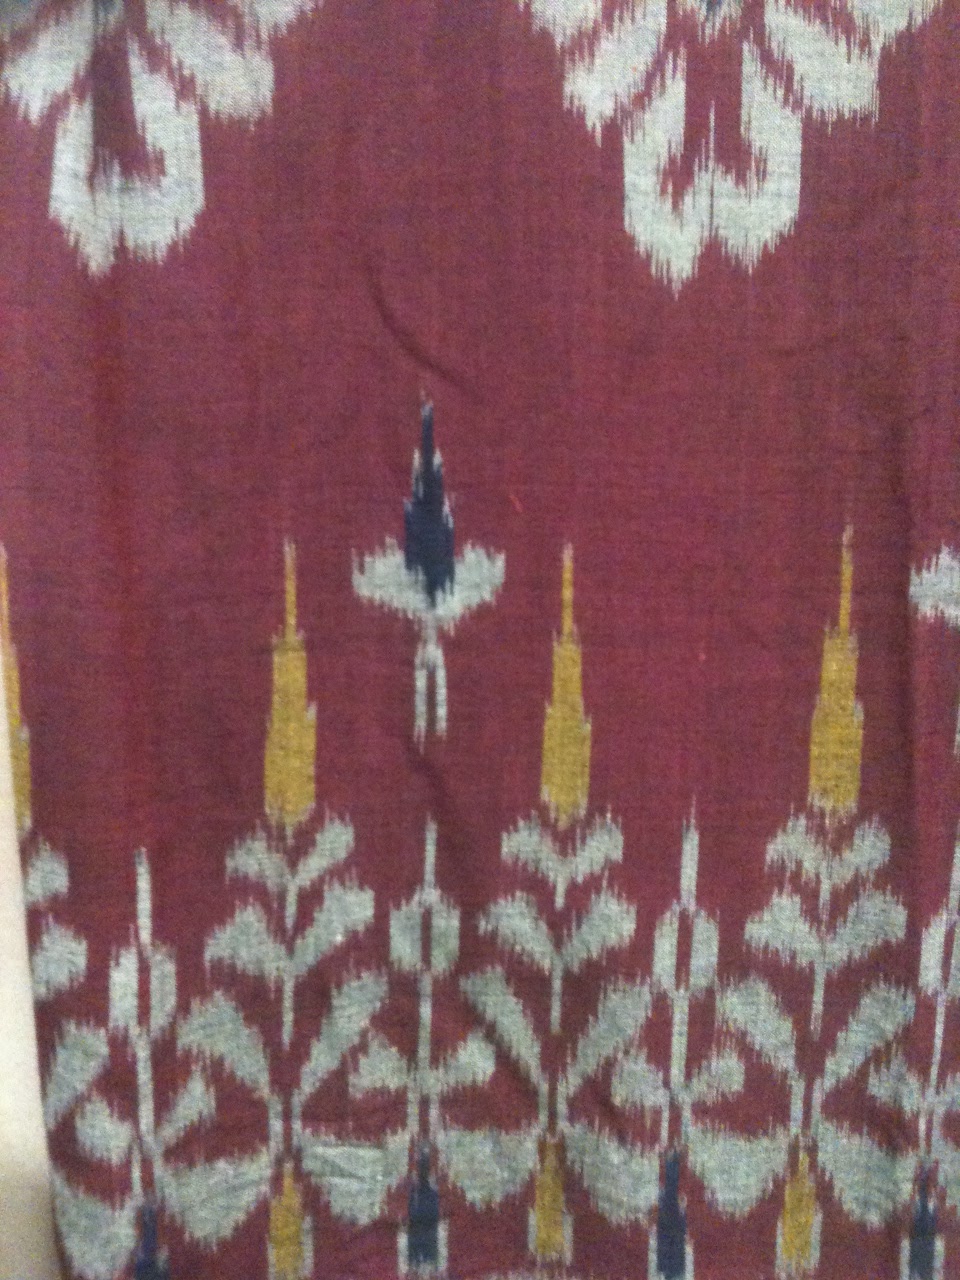
Just a few quick photos to show you what I'm working on.  I have a few things on the go...while I'm waiting for the silk to arrive from Dharma, which I'll dye black to line McCall's 8841, I started cutting out this amazing 100% wool from Mood.  It's very texture-y and I love it.  Also, fairly drapy, too, so I think it will look good for the dress.  

I also got some silk/rayon lining in a blue-gray color for the lining...it's also amazing and I got extra (watch out for those Mood one-day sales!), so I'll use it for other things, too...maybe a new slip?

What's in your sewing queue?


Friday, July 19, 2013

Slenderette 2: Fully-Lined & Finished!

Here's my 2nd take on Simplicity 2847, a Slenderette pattern (just love that name!).  I finished it a few weeks ago & have worn it twice--and received lots of comments about people needing a vacation!  

Close-ups of the fabric & the pattern are here.  

The Roommate thought the fabric was for him when I first pulled it out!  I set him straight on that, explaining that it was 4 yards, not 2, so unless we each got matching shirts, I was turning it into a dress.  He decided he didn't need another surf-themed shirt.  

I also fully-lined this with some 60/40 (poly/cotton) I got on sale at Hancock's.  I think I bought 10 yards.  I mostly had the lining figured out but got a bit of help from Allison at Bits of Thread.  

I am still using up bits of my old hapi coat from Japan; I'm really having trouble giving it up.  You'll see to the right that I used it to line the sleeve-cuff, and I also used it for the pocket-lining.  I like having those little reminders.  

This is a great summer dress.  Nice enough that it looks good for teaching or conducting tours at work, but it's very comfortable & has pockets.  I also think it's flattering...although I'm not sure I look slender in it!  But I can dream. 


Friday, July 12, 2013

Western Africa Shirt?! Finished!! Simplicity 6693

I doubt I'm the first person to think of this, but I am so pleased anyway...a Western shirt for the Roommate, made with West African fabric!  *smirk* 

So you saw some previews in the last post, but here's the whole chimichanga!  With the supermodel showing how it's done...

I took lots of pictures for 2 reasons: 1) I'm extremely proud of it and 2) because I wasn't the one having my picture taken!  I do not love being on the other side of the camera.  

This first picture shows the Roommate wearing a BIG smile (it may not look like it to you, but believe me, after 30+ years, I can tell when he's happy--even if you can't!).  I think he likes it.

It was actually fairly easy.  I have really always thought that making men's clothing would be the hardest thing possible, but after 4 pairs of underpants and 2 shirts, I'm feeling less intimidated.  So much so that I'm going to repair some of his Mohammed-made suits which are mostly in good shape, but the lining needs some repair and the buttons need replacing.  I won't be making any ties or suits anytime soon, though.  

I'm starting to realize that perhaps it's the fabric & fitting that makes things difficult, and if you work with cotton and sew for men (who don't need so much fitting), it's not that difficult after all!  

The second photo, on the left, shows the medallion, which appeared by accident in the fabric we bought in Cote d'Ivoire.  I think it looks great & is a super substitute for the embroidery recommended on the original 1974 pattern.  

I was thinking about a Western (African) shirt after seeing Cracker & Camper van Beethoven a few months ago at the State Theatre...then I figured out where to get the pattern from Zoe's post about the shirt she made for her husband.  

I really love how the big print & the little print work together, too.  

Some of the stuff I learned while making this pattern...

First, the collar band.  I was so confused at first I tried to just sew the collar on, the way I do with my clothes.  But then I went and looked at some of the Mohammed-made shirts the Roommate has & figured it out quickly. So I took it off & did it again.  (I was glad to see even Tasia has do-overs!)

You can see the collar band up close in the 2 photos below:


And second, how to put on pearlized snaps.  Which you don't need a special tool for; the instructions on the back of the Dritz snaps are very good. And very good for working out your frustrations! 


The photo above shows the button placket detail, with the snaps, and also with my extra attention to detail.  I have mentioned before how often in West Africa we noticed they use the fabric right up to the selvage.  Why not? It saves hemming & you get a bit more additional fabric.  

The fabric I used had great selvages on both the large & the small prints. You can see how I incorporated it into the placket, which I think looks pretty darn cool! That same selvage also worked to line the edge of the slash for the cuffs.  You can see that in the detail to the right.
Pocket with snap!

The pocket was another area where I used the selvage.  Here's the London Wax Prints & the RB mark which show on the pocket upside down.  But that way the Roommate can read it!  I did not put the snaps on the pockets...couldn't quite decide if it needed them; I may still do that.  


A few more pics below and I'll stop.  I hope this inspires you to try something (somethings) new, too!

And I think the appropriate music for this particular episode?  Euro-Trash Girl by Cracker!


Someone is on summer vacation & hasn't been
near the razor much!

Friday, July 5, 2013

Reverse-Thinking (aka Planning)

You'll see from my posts about batik and ikat that one thing that really impresses me about these techniques is the planning required to think "backwards."  By which I mean starting out with the lighter color, then going darker & darker to create a multi-colored piece of art.

As I've mentioned before, ikat & batik are the 2D/textile versions of relief carving techniques for wood or marble...both of which completely mess with my brain.

What it comes down to is planning.  Which I think I'm pretty good at, but when sewing I often find that maybe I'm not as good as I think I am!

For example, the Western shirt I'm making for the Roommate, Simplicity 6693, which I found at Etsy after being inspired by Zoe's shirt for Paddy.  I decided to use this wax print we got in Cote d'Ivoire for the contrasting yoke & cuffs, because though it's amazing, it's a huge print, which I can't get anywhere near my body--the hugeness might overcome us all--and there's not really enough to do much with, other than pillows.  

(Maybe I mentioned that most fabric in West Africa is sold in 2 yard or 6 yard pieces?  Because 2 yards are needed for a pagne, from which you can make a skirt, a top, a headdress, or a carrying cloth for your baby.  So that's why I didn't buy a whole lot of fabric...I was going for variety so bought many 2-yard pieces, or smaller scraps, rather than a few 6 yard pieces.  We brought home 80 pounds of textiles, leaving almost everything else we had taken behind, so I wasn't going to waste space or weight on big batches of a few samples.)

Anyway, so, without really thinking I cut out the contrasting yoke & cuffs.  Then, when I went to sew the yoke onto the shirt, I saw this:  

Without noticing, I had a huge medallion right in the middle of the contrasting yoke.  Except it wasn't exactly right in the middle, darn it!  It was about 9pm, so I decided I'd take a look in the morning.  

This often happens when I make a mistake.  I walk away from it, especially if it's getting close to bedtime, because I often find I just make even more mistakes, which require more ripping out & re-sewing.  I also very often have to talk myself into the ripping out/re-sewing part!  I am essentially quite a lazy person & avoid do-overs whenever possible.  I'm much more of a make-it-work and hope no one notices girl.  

So I get up Saturday morning, take a look at the shirt, and though I know that the Roommate wouldn't notice, and probably most people wouldn't either, the amazing medallion will be most effective if I un-sew/re-cut/re-sew.  And really, I brought the darned fabric all the way from Ivory Coast...why not use it well?!  And after yoga...

Here's the new yoke, after the re-cutting.  I think you'll agree that it's going to look great...and sort of goes along with the suggested embroidery featured on the pattern's cover.  

My least-favorite, but most-used tool, along with a preview
of the main fabric for the Western shirt.


Saturday, June 29, 2013

More Indonesian Artwork (from the collection)

This first item is the Roommate's sarong for our 2 month trip to Indonesia.  Sarongs & sashes are required for many formal events (shrine festivals, theater performances), so these wearable souvenirs were one of the first things we bought.  

This is ikat, which I always think of as a fuzzy design.  Ikat is when the weft threads on a loom are dyed, then manipulated a bit so the edges of a design are not crisp.  There is also double-ikat, which is when both the warp & weft are dyed & manipulated.  Whitney Matalone has posted a riveting time-lapse video here. 

Ikat is called kasuri in Japan and is usually just done w/ two colors there.  Typically indigo & white or, less often, brown & white.  But you can see that in Indonesia, it's done with many different colors.  Either way, I find ikat pretty amazing.  As with batik, it takes a lot of planning & prep, but I think you'll agree it pays off in the end! 


An ikat sash.  The threads are not as fine as in
the sarong, making a less detailed pattern.


Monday, June 24, 2013

Vogue-Wearing Roommate in Math-Flavored Shirt

Here we have the ever-handsome Roommate/Spokes-model showing off a new shirt I just now finished.  

Bits of Thread, where I take sewing classes, has a fabric "recycling" program, where they get fabric & notions donated to Goodwill & the Salvation Army and sell it quite cheaply ($3/yard).  The proceeds go to fund free sewing classes in DC.  

So, even though this is the thirtieth (yes 30th!) fun shirt the Roommate has, and all the rest were made overseas...he now has yet another, made in USA, and I made it, using Vogue 8800.  

Problem is, when I saw this math-related fabric, in an amazing color, I just couldn't resist, and knew he'd love it, too; even though we can all agree that he has way too many fun shirts.  

This is especially suitable since he loves teaching math to his fifth-graders.  And I've been wanting to try out a simpler style shirt, as I work up my nerve to copy Zo's cowboy shirt she made for Paddy.  

I've been wanting to make a western shirt for the Roommate ever since we saw Cracker/Camper Van Beethoven last month (amazing show, BTW).  And both David Lowery and Johnny Hickman had on western shirts.  Guitarists always look cute, so I decided the Roommate needed one, even though he's not a guitarist and looks cute even without a western shirt.

Also, I'm having a slight bit of guilt as when we finally started dating, as opposed to being just friends, I made him get rid of his polyester shirts, his bell-bottoms, and his western shirts.  My only regret is the western shirts, though!  So I figure he needs one now, and I have the perfect fabric for it (a surprise).  

But, I wanted to try out an easier man's shirt first, so Vogue 8800 was it.  I think it came out pretty well, and he's pleased, too.  He's got some classes next week at the NEA, so an education-oriented shirt will be appropriate.  

Doofy-looking models, but the
shirt pattern is great!

Friday, June 21, 2013

Indigo Batik - from the Vault!

On the left, below, is the sarong I mostly wore during our 2 months bumming around Indonesia in 1995.  For visits to all shrines and some performances (shadow puppets, kecak dance, traditional dance), a button down shirt & sarong & sash were required for both the Roommate & I.  
I believe it was made with a stamp?  Or a printer?  Is there a printer that dispenses hot wax?  I should look into that.  The pattern is very regular overall.  


Anyway, the fabric on the right is some less-precise batik, which looks totally hand-drawn by someone with a tjanting tool.  The design is fairly regular, but not perfect.  I bought 2 of these sarongs, and later had them made into a bedspread, which got quite faded in Oman...even with the curtains closed!  (Just a LOT of light there.)  

The link for tjanting will take you to Dharma Trading, where you may want to have a look at some of the batik stamps, too, just to get an idea of how those work.  

Batik is one of those techniques that is very difficult for me to think about...because the artist must keep preserving the lighter color with wax, then dying it darker & darker & darker.  With 2 colors, it's not so difficult (though there is so much white on the first batik, above...what kind of stamp was that?)...however, it's sort of like relief carving...you have to take away the air, and leave the thing you want the carving to show.  It all seems sort of reverse and counter-intuitive to me!  

Hope you enjoy seeing these; I'll show some more batik, from India, Africa & Java soon.