Showing posts with label smocked. Show all posts

Tuesday, March 18, 2014

More Cushions for our Sun Room

If you've been paying attention, or even if you've tried not to, you know that last summer we finally got our sun room fixed up.  As we sit by our gas fireplace, looking out at another 8" of snow, we are feeling pretty pleased with ourselves!  Others are complaining about the late winter weather, but having a gas fireplace makes it all okay!  

I have really enjoyed making cushions to go with our new couch, and the chairs we've had for a while.  So here are some photos to show you what I've been doing...


This first is a smocked cushion, sitting on one of my wax-print quilts, which looks amazing on our leather "slipper" chair (from West Elm).  Smocked cushion detail below.  I got a scrap of fabric at my sewing studio, Bits of Thread, which was upholstery fabric. Stiff fabric really shows off the smocking...


The other cushion was also made from scraps, that I got from Freecycle.  I put a request out for cotton or quilting fabric, and got a huge bag of all sorts of fabrics, some scraps, some quite large pieces.  (I had good luck asking for old woolen sweaters & knitting accoutrement, too.) 

So here's the detail of the other cushion...I just sewed diagonally every inch, then slashed between that sewing, to show the fabric underneath.  


And here's the cushion, sitting on the other "slipper" chair.  I have made at least 5 other cushions, with a few more in the planning stages.  Cushion making is a lot of fun.  I can try out a new technique, use up some cool fabric that I don't have much of, or play with some color combinations.  


Tuesday, October 22, 2013

And even more about Smocking...

I may be teaching a "how to smock" class at Bits of Thread in DC next spring, so I've begun doing all sorts of research on how smocking has been used throughout history (not that easy to find, unless you're talking tradition ("English") smocking.  I am focusing on Canadian or North American smocking.  Here's a fine example of it from one of Judi Dench's costumes from Shakespeare in Love...
Look at those sleeves! 

Here are a few things I've made as samples, just to see what types of fabric work, and what types of patterns work on different materials.  
This first one is on a piece of Thai silk.  After smocking, I tried ironing a bit after smocking...just to see what would happen.  I'm not sure I like it, but if I ever wanted to do something with it, I could rinse it out & fluff it up.  I was going for the Judi Dench sleeves look, but don't have the patience. Notice I didn't add any pearls either! ;-)
The front of a small piece of batik.  I tried this to show that the business of the print sort of takes away from the smocking (though it does look better in reality).  And here is the back, about 1/2-smocked, with the Pellon grid + my marks:  


This is on a piece of cotton velvet.  I think it looks quite nice.  It makes the square into a parallelogram, and it would take a firm cushion & some work to re-square it.  But it looks a lot better pulled out into a square so the design shows.  
Fake suede, very slick & polyester-y.  I think if you were going to do something with the squares you'd have to fill them with batting as you stitched each one.  I've seen this recommendation for other smocking patterns, too. 
Front of doubled 5mm silk
This is the back of the doubled 5mm silk I bought way too much of. You can see all my markings on it; all made with the iron-away Pilot Frixion pens.  Rubbing the lines, or a bit of warmth, removes them completely.  
This very slick polyester hasn't been tamed into smocking yet.  First I tried ironing on the Pellon fusible grid interfacing, but it made this thin silky material way too stiff & weird looking.  Then I tried drawing a grid on the back with the Pilot pens, but really couldn't see what was happening, partly because of the print, but also because the silky material resists the pen.  I could probably use a Sharpie to draw the grid, but that would be pointless because if it shows through, that won't be pretty.  

I may try ironing on the grid again, then washing it before I do the smocking.  Or washing it after I smock.  Either way, I want to find if the grid interfacing will soften up and the fabric will look like silk.  On the other hand, smocking really requires fabric with a bit of stiffness to it, so who knows--it may look awful no matter what!  

I found a few more blogs with posts about Canadian/North American smocking.  First, Vani, who does lovely work, embroidery & yummy cooking, but here's one of her detailed posts about a trellis pattern with flowers that I found really helpful.  She is good about answering questions, too.  

For some more lovely smocking used in haute couture, here's a post about Miu Miu from 2012.  

Passion et Couture has a wonderful trellis pillow she made using printed cotton; it's just the right mix of print & fabric & technique!  

Lovely curtains with smocking at the top from Maison de Pax!  This honeycomb pattern is simple but ever so effective, don't you think?

Finally, after quite a bit of research, I've found 1 book in 2 volumes by Debbie Shore which seem to focus on Canadian smocking, not English smocking (though she is English).  The publisher is Vive Books, and the title is Modern Smocking.  You can get a CD version, or a downloadable e-book, and there's a deal if you buy both volumes together.  

If you look up Debbie Shore on YouTube, you'll find she's done quite a few tutorials, which will give you plenty of ideas for applications & techniques!  

If you give it a try, please let me know...I'd love to see what you come up with.   

Tuesday, October 1, 2013

Smocked Pillow

I bought this remnant of navy fake suede a while back to try with smocking.  I mentioned in my previous post that I want to make a bunch of smocked pillows for our soon-to-be-purchased couch.  

Here's a bit of info about how to smock, and to show you what's been happening with this particular item...


Here is my cheap-o way to get a grid on the back of the navy suede.  I had a bunch of scraps of fusible interfacing.  I then drew a grid onto that interfacing.  You can buy Pellon fusible grid interfacing, but it's rather expensive (I think).  
Depending on the type of design you want on the front, you draw different patterns of lines on the back.  If you look to the right side of the above photo, you'll see I've already done some of the stitching: Tuck & tie the solid lines, while leaving loose the spaces between the solid lines.  You can see my knots & my loose pieces of thread if you look closely.  
I think it is magic.  That simple grid & markings, some easy stitching, and Wow! A lovely basket weave 3D design on the front of my suede pillow!  
Above are some remnants I got from fabric.com.  I wanted to see how these fabrics would look when smocked.  The cheetah is a very shiny polyester, the brown is another fake suede.  The solid cream & eggplant are linen/rayon blends and the 2 flowery prints are from Amy Butler's Gypsy Caravan Stash line.  

However!  There is a problem.  I love the 2 Amy Butler & linen fabrics so much...but only got a yard or 2 of each.  They are all quite wide, though.  So now I'm thinking, "Who needs pillows?!  I need skirts!"  Stay tuned to see what really happens with these!  

A few smocking tutorials from around the web.  And if you're looking for smocking pics, don't be surprised at how many smoking pics you get.  ;-P

Here are honeycomb smocking tutorial & a lattice smocking tutorial from Learning to Fly.  

And a pin tuck smocking tutorial from Sew Mama Sew.

There's also a round pillow project in the first One-Yard Wonders book.  

Update! Found another great smocking pattern on the Threads.com site.  Really cool lozenge looking smocking which would make a great waist decoration (see the photo!).  

And here's the blue suede pillow finished! Well, the smocking is finished (watching a movie is a great way to get handwork done!).  Now I need to make it into a pillow. 

An important consideration is how the smocking changes the shape of your fabric. This was a large square, but now it's a rectangle.  I think some planning & thought would be involved if you had a certain pillow shape in mind when you started.  Me, I'm going to smock smock away, then find pillow forms that fit the completed work!  

Tuesday, September 24, 2013

Smocking! But not for clothing...

When you think of smocking, if you're like me, you think of this:
http://blog.fidmmuseum.org/museum/2009/12/smocked-frock.html
This is from the mid-1890s, and it's Liberty of London!
Or, perhaps you think of this:
http://newarrivalclothing.blogspot.com/2010/03/smocked-clothes-for-easter.html


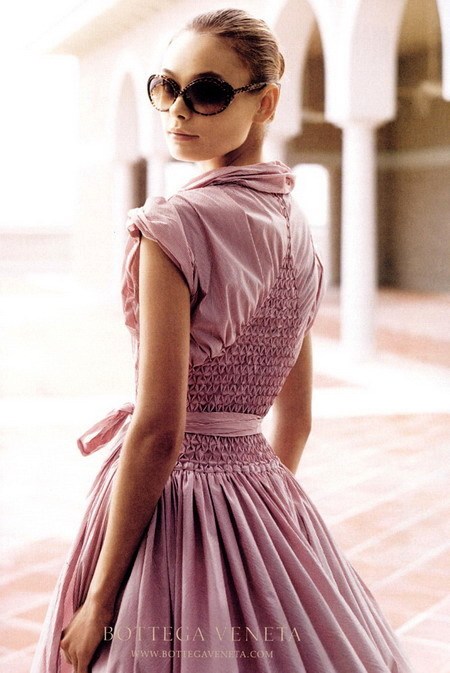
Or, you might even think of this:
http://oliverands.com/blog/2013/03/the-new-smocking-an-obsession.html
 Bottega Veneta
I must say I love this pink dress.  Smocking is an interesting way to add elasticity to a garment, especially back in the days before rubber & elastic.  For me, just another ingenious technique humans came up with to solve problems.  

I learned a bit about smocking when I lived in Abu Dhabi.  The quilting group there had a demo about it & I was fascinated how flat fabric became richly textured fabric with a few simple marks & stitches.  When I was at my sewing class last week, I bought some fake suede remnants to do some experimentation with smocking.  I'm thinking that when we get our sun room finished and finally buy a couch, we're going to need pillows.  And smocked pillows would be pretty fun.

Also, it's a by-hand hobby (like knitting or crocheting).  Whereas I can only do sewing in my sewing room.  I can smock in the comfort of our sun room with the new fireplace! Obviously I'm planning for winter already!  

Here's a photo of some before navy suede.  Next post I'll show you what I've been doing with it!